Final Piece

Final Piece

About the Blog

This blog is a representation of my working progress as an Artist and Writing. Everything here is an example of my work and a journey through my working. It acts as a documentation of various projects, ideas and rough experiments, starting from my time at University and beyond.

31/01/2014

Workshop | Audio | Part 2 | Making a Sound Installation

The second day of the sound workshop got more experimental. Having explored ways of recording sounds, today I had the chance to use different ways of presenting sounds. Using various sensors that changing pitch, speed, volume and echoes. The studio theatre became a interactive soundscape consisting of four free standing speakers connected up to a laptop in the middle controlling the affect the sensors have on the sound.


Light sensor 

Does exactly as the name suggests, depending on the level of light it is exposed to it will change various aspects of the sound like volume, pitch and speed depending what you set it to. We connected it to a speaker, using it as a volume control, when the light was on it was on at full volume, as the light dims, so does the volume of the sound connected to it. In darkness it is muted. I played with the idea of blacking out the room and controlling the light source through a lamp, which could be moved and dimmed to manipulate the sound.


Pressure sensor on the floor

Unlike the light sensor which has a steady gradient level, the pressure sensor is a simple on/off switch which as it says responses to the pressure added to it. Placed on the floor we have invited people to step on it to turn the sound from the speaker on and once their foot is removed it switches straight off.

Flex sensor on my hand

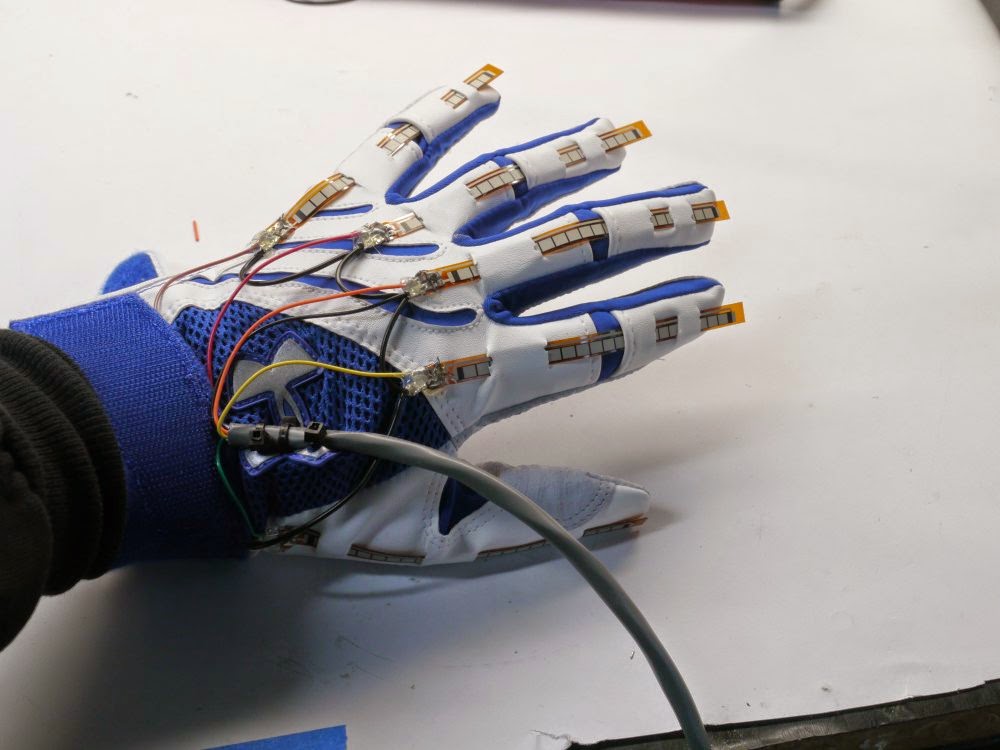
These flat sensors enable you to pick up movement as they are flat and can stick to your body, like above I attempted to pick up the moment in my hand, with the final outcome of attaching a strip on each finger to pick up each individual bend in my fingers. Unfortunately masking taping them to my finger causes it to limit movement and what the sensor picked up, however on further investigation I found it is possible to create gloves as seen below, these hold the sensors in place and tidily, also allowing full moment of the hand. I like the idea of trying this out. My idea is to play with the notion of non verbal, almost silent communication such as sign language and using these sensors to get an idea for what it would sound like to add sound to body language. This is an idea to come off the back of this workshop and I will return to it at a later date.


Laser and light sensor combination

The laser works with the light sensor to create another on/off switch this time if the laser line is walked through which breaks the connection. The laser is placed at one side and the light across from it so that the laser lands directly into the light sensor. This one is a little fiddly to get lined up and can sometimes slip slightly causing it to break the connection. But if stable works well.


Using all these techniques, sensors and sample sounds we set up an interactive walk through around the studio theatre. Below is some sample videos of the final piece created from the workshop. 


I have a lot to consider from this workshop and I am defiantly going to revisit the flex sensors, if not all of them. There is so much to explore, this day was only a tiny bit of it. These sensors can also be hooked up to video and controlling the visuals in the same way it did to the sound. 

28/01/2014

Workshop | Pinhole Photography | Part 2 | Further Exploration

The second part of the Pinhole workshop was a chance to use our basic knowledge of the technique and explore with different types of pinhole and using different containers. I decided this time I would try a harder form from the box pinholes and create a matchbox camera using film this time. Using film can lead to sharper images and only needs a short exposure time, seconds compared to the minutes in the box ones.

Steps of making a Match Box Film Pinhole Camera

Things you need:
-Black marker
-Match Box
-Empty film canister
-35mm black and white film
-Black tape
-Black foil
-Small piece of thick card
-Blue tack

1. Taking the match box and a black marker I coloured the inside of the box black in order to stop any light leaking through the box as this would either mist or completely void the image.


2. Once the inside is blacked out, I cut a small box in the center of the sleeve, it is important that it is in the middle in order to make sure the pinhole in center so that the light reaches the piece of film. I then cut out a frame in the box bottom, you can use any shape and size (limited to the size of the box), this allows you to add a frame to the image if wanted. Examples being a circle, so that the image is only present in that rounded shape on the film and the rest is black.


3. Now tape the black foil onto the little window on the sleeve and add a very small hole in the center of this. Now slide the frame back into the sleeve and feed the film through as seen below. The matte side facing the hole.


4. Feed the film into the empty reel and close the canister. Make sure this is tight and will enable you to twist it round to take the film. Tape both of these tightly together, remember which side has the film in it and which is empty, mark this if needed.


5. Fully cover the camera in the black tape, making sure no light will leak in. Mark which side is unexposed, so you know which direction to turn it. Add the thick card as a little door over the hole so you can open and close it, seal with the blue tack when you aren't using it.


6. Now the camera is ready to take out, exposing each part of the film, ranging from 25-40 seconds each time. Then covering the hole and twisting 2/3 full turns toward the exposed section of the canister.


Unfortunately when I took it back to the dark room and developed the film I found I didn't tighten the connection enough and it came loose, meaning that the film didn't turn. So I was unsuccessful this time, however for next time I know to tape the connection and tighten it more than before. Also making the frame as big as a did meant that the film got trapped in it, so next time I will try a smaller frame to avoid this.

24/01/2014

Workshop | Audio | Part 1 | Experimenting with recording sounds

Today's sound workshop covered various ways of recording sound using different microphones and sensors to pick up various different types of vibrations that create sound.


First we used used a contact microphone, these pick up the vibrations of the surface they are on and won't pick up voices and other similar sounds. These are connected up to handheld audio recorders in order to collect the sounds.


Here we used a contact microphone on the metal table and a piece of string from this with a ruler hanging in the middle of this. By hitting the ruler, it sends vibrations up through the string into the contact microphone, creating a ringing sound. The same idea as a string and can phones.


I tried the contact on a variety of surfaces, firstly the table which gave a low droning sound, which when put onto walls or the floor unless disturbed or stood on, all made that similar sound. The window however created sounds that both took the sounds of the outside and inside, through the window the outside sounds of traffic bounced off the window creating an echo effect. We tired it on the tree next, hoping we could pick up the sound of the movement of birds in the tree or the wind blowing it. This wasn't the case and we didn't pick up anything.


The last we microphone we tried was a hydrophone which records under water sounds. We placed it in a cup of water, along with a contact microphone on the outside and recorded what it sounds like to blow bubbles through a straw into water, taking the contract between inside the water and the sound from the cup. It created a lower sound of bubbles being blown into water, but made an eerier sound.

Some of the sounds recorded today can be found below from my sound cloud account.

23/01/2014

HOARD | Towards An Archaeology of The Artist Mind | Exhibition (January)

The second HOARD exhibition I have attended that runs alongside the Vantage Art Prize. Having been to see HOARD just about a month beforehand I was surprised to how much this exhibition has actually changed. It is a constant changing project, however the rate it is changing is extremely fast, each visit there is something completely new or expanded in the collection of items by these artists.


Some pieces use audience interaction to expand and grow as a collection.
Above is the work of Hazel Smoczynska and Rosie Parsons who are Frauhaus.

Artist statement

Frauhaus is a lingering fear of the ghosts of the cold war and the horrors of the 21st century. Haunted walking, lost answer phone messages, future shock, and unfamiliar sounds in in familiar places. We listen and give voice to the information, planning and anxiety of the recent past, and make space for it in the present.

Frauhaus’ starting point for this project was the BBC transcript to be used in wake of nuclear attack. Collected recordings of this ‘last broadcast’ form part of the installation, alongside a place to retreat.

-----

The first Hoard exhibition I was at they were inviting people to record their voice reading and a transcript. This time round the audio playing is people from the last exhibition reading the transcript. They use audience interact to inform their next steps for the project, first connected with the BBC transcript now branching out from this one focus point.


Above is the work of Jade Montserrat, the last time I saw her work it was a mixture of furniture and items that were wrapped in tape, changing its form and structure. Now these items and others have been transformed into an archive housed in a series of hand made boxes, each labeled and documented in a catalogue, placed on the table by the boxes.

It's not just impressive to look at from a distance, the way of stacking has made a wall that forms a sort of stage in the middle. By stacking and documenting each box with a chalked reference number, it makes you wonder more about what is in the boxes. Which encourages you to return to the catalogue and look it up. As the work spreads out so does the ideas and subjects Jade tackles. These series of boxes have come to an end for now, but the process of exploration continues.


As the exhibition comes to an end, the exploration and work of HOARD will still be changing and continuing. I look forward to seeing how this may differ to the next exhibition.

Workshop | Pinhole Photography | Part 1 | Building a box pinhole

Today we had the opportunity to do a Pinhole Photography workshop, I have always been interested in giving it a try, especially as I like the idea of having less control over this type of photography, you are unable to see what it exactly is you're taking an image of. It takes time and knowledge to explore this type of photography by which point you can make educated estimates on lighting, timing, direction and also the limits of the practice.


By using a pre-laser cut box template, we each created our pinhole boxes that would fit an A6 piece of light sensitive paper at the back of the box, of which on the opposite side of this container is a small hole for the light to enter. 


Each location required a different time to leave the paper exposed. Out on the square was around 2 minutes, the courtyard of Vernon street was about 15 minutes due to the darker, move covered area. These were taken all based on guesses and at times a light meter reading. Each time the paper is exposed it requires returning to the dark room and developing the image, firstly to avoid the paper seeing light after the image is taken and secondly to see the results of the image, which will inform your next moves in considering light and timing. 


After we exposed the paper, we developed them creating an image negative as seen on the left of the image below. Once fixed and dried in the dark room, this is then place on top of another piece of paper and exposed to light from the enlarger. This once developed again produces a positive to the negative. My favourite image created from the day is the one seen below, I love how the positive and negative match up to create this left and right contrast. 


Experimenting with photography is something I want to take further as well as super8 film, all an interest of mine and the experimenting involved in these processes. 

18/01/2014

Research | The uses of found words | On the internet | YouTube

Looking further into how existing words and conversations can be used, especially on YouTube, considering ideas of how to further my own work.

I found other ways that YouTube comments have be reused, unlike Adam Buxton's stand up comedy style, these readings take a different approach. By using the comments as a script they have recreated these conversations into dramas, creating dramatic readings in a film like scenario. 


The next set of videos I looked at is a campaign from a YouTube musician, to send him tweets of which he would on the spot create a song using them. Unedited words, parts working, parts clashing, but creating something that wouldn't have been written without this element of chance. 


A lot of these channels use the instant nature of the internet to gather information, and also the memorable, entertainment value to get audiences to watch their videos, instead of others in a mass of YouTube videos. 

16/01/2014

Research | The uses of found words | On the internet | Adam Buxton

I'm taking a further a look into the uses of existing/found words and how others may have used them to make new creations, performances and so on.  On of these resources for streams of text is the internet. In looking at the internet and especially YouTube, its always worth starting with the king of YouTube Adam Buxton.

I first came across Buxton's work when I attended a Creative Networks event last year where he was the guest speaker for that month. Buxton's career is made up of silly comedy like videos that have been taken to the platform of YouTube. He also uses YouTube and existing videos and content to produce more work which can be found in his television show 'Bug'.

His show Bug takes videos, mainly music videos from YouTube, showcasing the weird and wonderful that are out there. He also does a section where he talks through the comments made by people toward the video in question. He performs them as he would imagine to what the person would act, look and sound like. All under a jokey tone, analysing the conversations that arise and turning it into a stand up style of comedy.


The idea of voicing over words, and turning them into a performance is one that interests me. Rather than write from a blank sheet, it takes the approach of taking a page of existing text and molding it into something new. By not editing the comments, Buxton uses the misspelling, bad grammar and slang as a commentary on how the internet is used and the type of communication that arises. Also to make it funny.

Also I have noticed the successful YouTube videos that get the audiences, are quite short, straight to the point, usually funny and/or memorable. YouTube is instant entertainment with an demanding audience, if art is to become a part of it, it would have to mould to that also.


13/01/2014

New Project | No Sketchbook

As I am given a new brief and the new project begins, I have chosen to continue with the same idea and thought processes before. However I have decided to do one thing differently and that is to ditch working directly and solely into a sketch book. Through the last project I have become so bogged down in filling the pages of each book to find that one, I don't explore outside of this very well and two it becomes stuck in a book and that is it.


So I have decided to remove the sketch book completely and document the whole project process on this blog, this way I can write and update any ideas any where I am, keep others updated on what I am doing, create an online presence of my work and also document further projects and work I have been apart of.

What use is a sketch book if I was just writing in it then not reviewing over it again, now I am able to search, organise and re find my ideas when I need them.

This blog will be regularly updated, personal, both formal and informal, it will be a stream of ideas that will be dated and stored. And if it is read and liked by others, that is an added bonus.